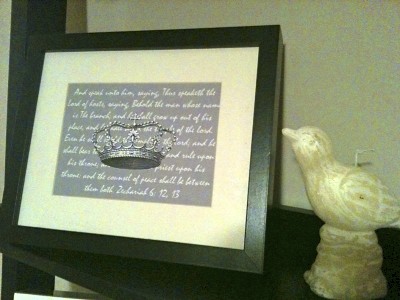
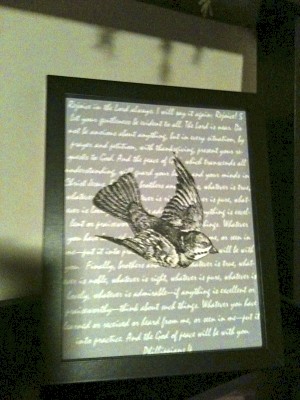
Picture Frame Alternative Project & Napa
I wanted to update some of the pictures in my living room so I combined vintage pictures with bible verses and framed them in my Ikea frames! It was such an easy and free way to add something special and unique to this room. I used photoshop to add the text and simply added the image on the top layer. The key to this was removing the white background on these images to make the image transparent. I found a great tutorial online at this website that showed me how to remove the background using the Mac preview feature. I found the graphics from Graphics Fairy again...love this site!
Here is a picture of what mine looks like...again please excuse this lighting...I had to use my iphone!
I am so excited for this weekend. I am going to Napa for my sister in law's bachelorette party on Thursday! I went to Napa last year for my anniversary and it was such an incredible experience. I know this time will be no different! We are staying in downtown Napa and we will be wine tasting on Friday and Saturday. I will post pictures when we get back! xoxo

French Inspired Candles
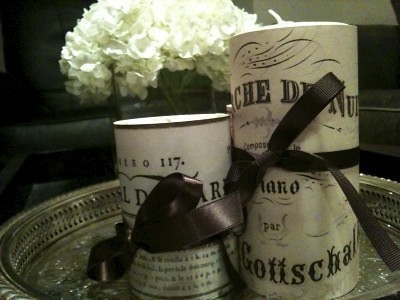 I have been totally inspired by vintage French images recently! After I graduated with my masters from Michigan State I went backpacking across Europe with my friend Kelly. It was such an adventure. One of my favorite stops was the south of France; the romance, glamour and history of this country were so apparent.
I wanted to tie these images into a project for the house. I really want some fabulous burlap pillows with French images and phrases from Etsy, but while I decide which pillows I want I made these French inspired candles below!
This project was super easy. I purchased a few candles of varying heights to use as the base. Then I scoured the internet for vintage French images that I could print. I found most of my images at this website called the Graphics Fairy.
After printing my images I measured the height and width of the candle and cut the paper images. I had to tape one side of the paper to the candle and I hot glued the other side. I finished off each candle with a brown satin ribbon. These candles are sitting on this amazing French tray I found at our local antique store!
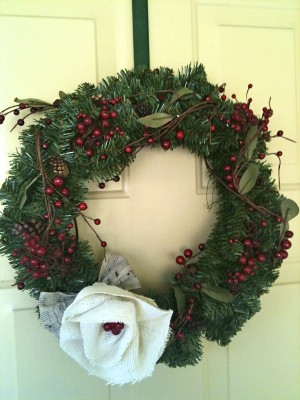
Christmas Projects
This is the first Christmas that I actually have a supply of Christmas decorations. Between the after Christmas sales last year and Kris' mom Terri giving me some of her amazing decorations I felt much more prepared. This year I went with a vintage country theme using lots of burlap, cranberries, fresh evergreens and vintage accessories & ornaments. Here are some pictures of my Christmas decorations so far...please excuse the poor lighting!
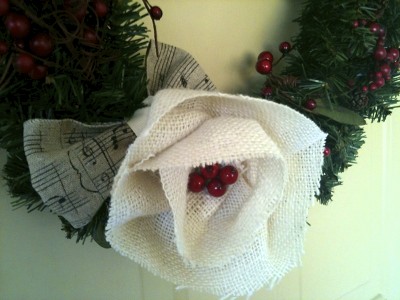
I made the wreath below for our front door using a plain wreath and cranberry garland from Michaels (about $4 each). I added some small pine cones as well that I had from Thanksgiving. I made the rosette from burlap and the bow from Pottery Barn vintage music sheet garland that we used for our tree. I am so happy with how it turned out!
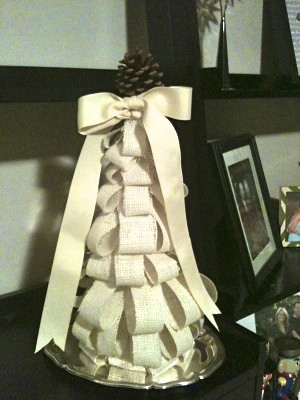
One of my favorite blogs, My Sweet Savannah, inspired two of the projects below. Melanie from My Sweet Savannah posted a project idea from Making Memories, the scrapbooking company a few weeks ago. The project is a looped paper tree; you can find the tutorial here. Although I love the paper idea, I wanted to stick to my theme, so I made it from burlap instead! After I finished the body of the tree I decided to add a pine cone to the top of my tree and finish it off with a large cream grosgrain ribbon. I'm so excited about this little tree!
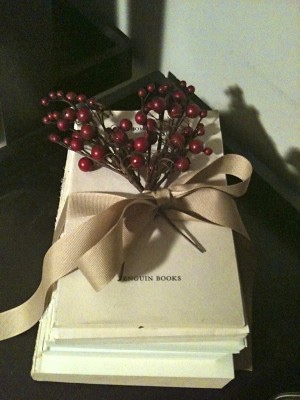
Sitting right next to my burlap tree is the stack of vintage books that I made earlier this fall; again inspired by Melanie from My Sweet Savannah. I added some cranberries to the top to make it more festive!
This wreath below was made from vintage books and a styrofoam wreath...so easy to make, I promise! Here is a tutorial, but instead of rolling the paper, I decided to fold/fan mine at the bottom. This wreath is right next to my favorite handmade Santa figure...you can see the top of his head here!

I found this super cute fir tree pomander from Michaels for $3! I took off the red ribbon that was already attached and added my own red and cream plaid ribbon that I have used through out my Christmas decor.
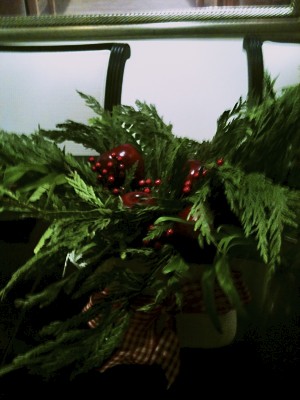
My centerpiece for our dining room table was made from a square vase I already had, floral foam, fresh evergreen garland, greenery from my backyard and faux apples & cranberries from Michaels. I covered the bottom of the vase with some burlap and finished it with the same ribbon used on the pomander above! I was inspired by this beautiful arrangement from Pretties and Posies! Just discovered this blog...it is fabulous!
 More to come soon! I am working on uploading pictures of our Christmas tree and some new items to my Etsy store including beautiful hand crocheted hats and rosette frames!

