Gem Accents
30 November 2025
4:03 AM
I have been loving the gorgeous natural stones and gems that seem to be every where from jewelry to home decor recently. Here are a few of my favorites.
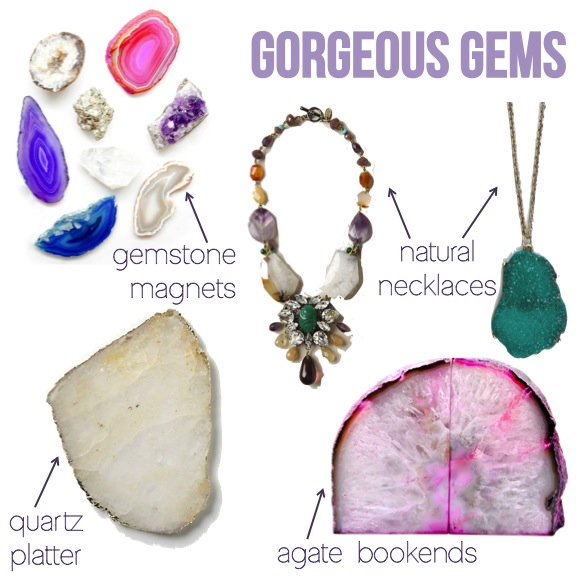
gemstone magnets, quartz platter, agate bookends, turquoise necklace, multi stone necklace
Aren't they just gorgeous? The bookends and magnets are really reasonably priced, and would be a great gift!
Aren't they just gorgeous? The bookends and magnets are really reasonably priced, and would be a great gift!
DIY Cable Knit Christmas Tree Topiaries
29 November 2025
4:07 AM
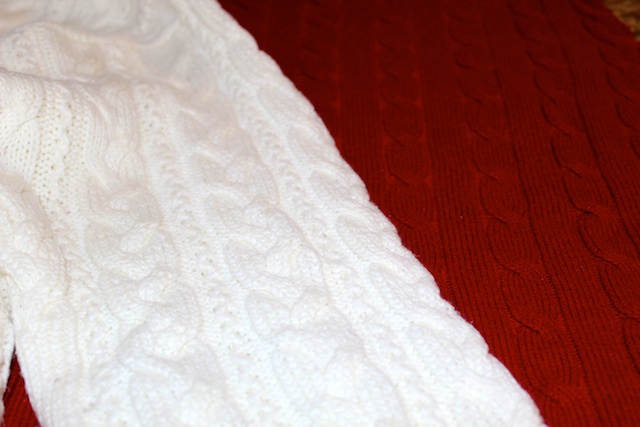
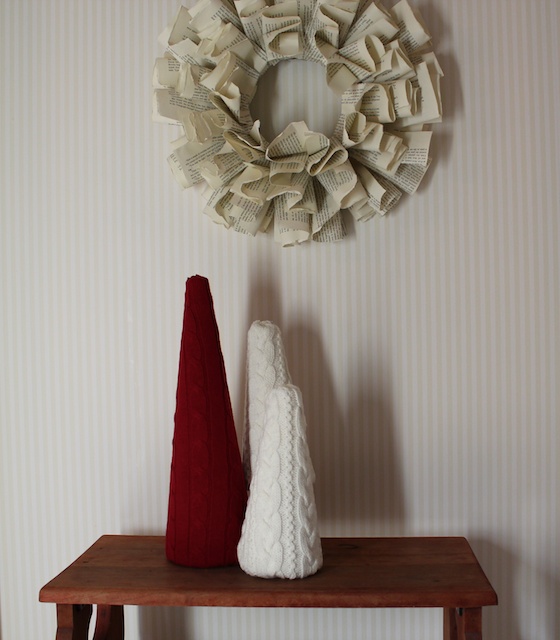
This past weekend I worked on a fun Christmas DIY project for my parent's house as a gift to them: cable knit sweater Christmas tree topiaries! I just love these topiaries. They are festive and add some fun preppy elements to your holiday decor.

2. Lay the sweater down so that the inside is facing up. This will be the inside of your topiary.

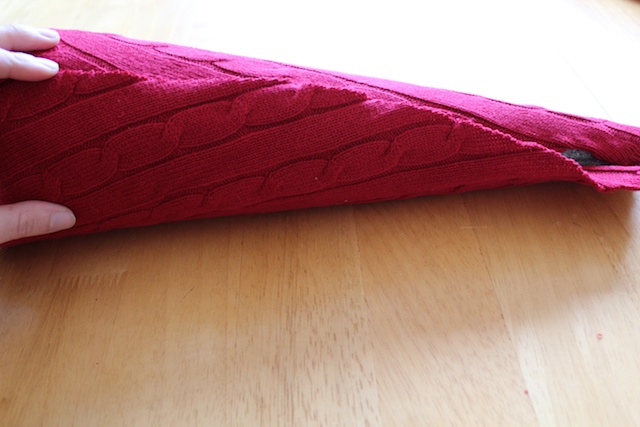
3. Place one of the styrofoam topiaries on the iside of the sweater. Using a pencil or marker (I used a sharpie because the material was so thick) roll the topiary, tracing the side and bottom edge. Cut the fabric along these lines with your fabric scissors.
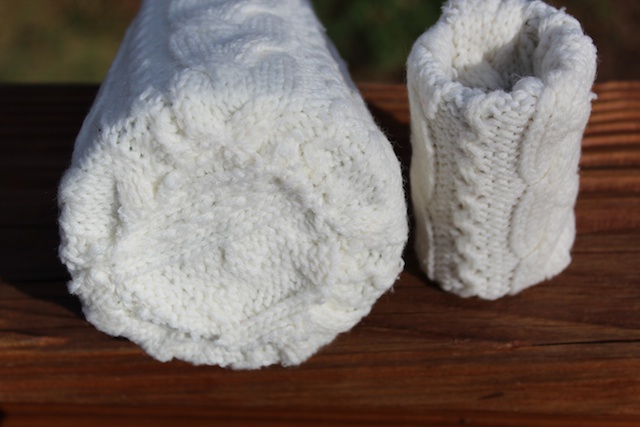
 After your fabric is cut it should look something like this.

4. Using hot glue, start to attach the sweater fabric to the topiary.

I used about three separate rows of hot glue and you want to ensure that you are keeping the fabric taut around the topiary. Wrap the fabric all the way around and secure with hot glue so the styrofoam can not be seen any more. If the seam is not perfect, dont'worry. You can either add some ribbon to cover the seam or just arrange your topiaries so it can not be seen.
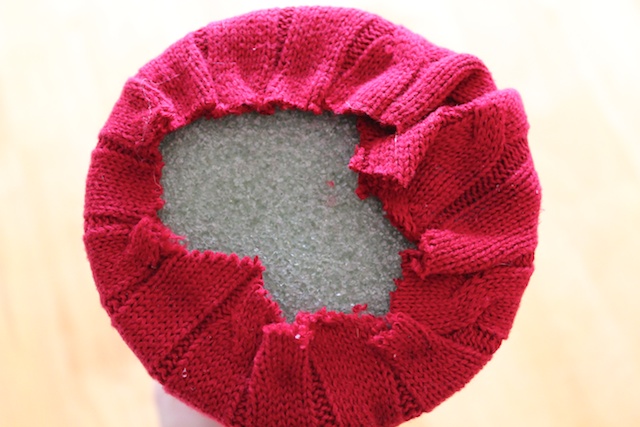
5. Pull the fabric down around the base of the topiary. If the topiary is going to be sitting on a flat surface (table, mantle, etc) then you do not need to cover the entire base. However if the topiary will be on some sort of stand, cut a fabric circle from one of the sleeves to cover the rest of the styrofoam.
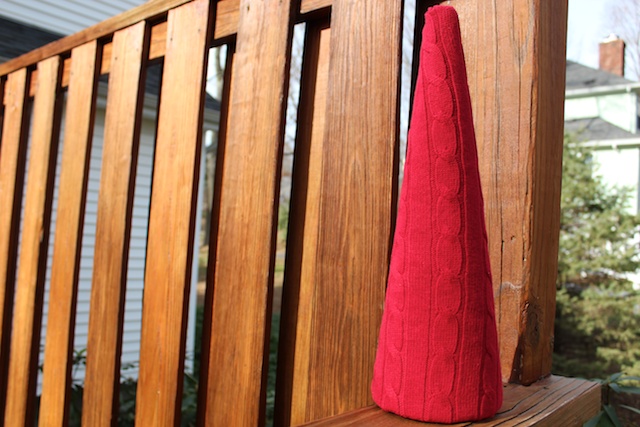
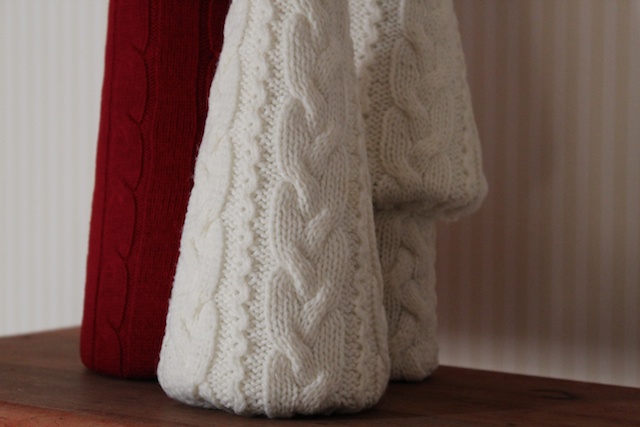
Here is the first topiary I made!
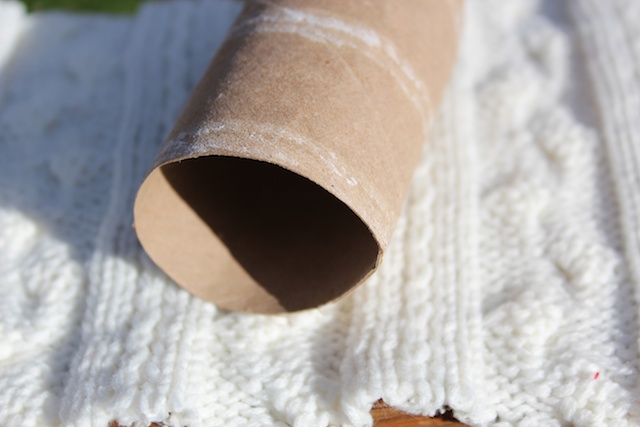
6. I made two other topiaries from white fabric using the same process. They looked great but I wanted varying heights so I added a tree base made from the inside of a roll of toilet paper. I simply cut it in half and layered one inside the other for stability. Then I cut a rectangular shape out of white sweater fabric and wrapped/glued it all the way around the tube. Push the remaining two ends into each side of the tube and glue.


7. Here are pictures of the finished product!

Here is what you need to make your own:
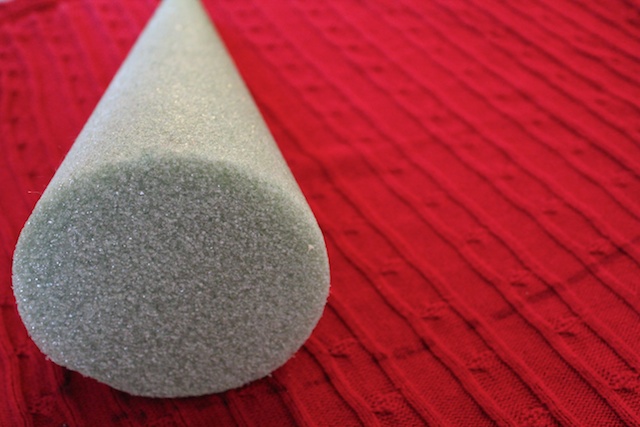
- Cone shaped styrofoam topiaries from a craft store (I used three: one large and two small)
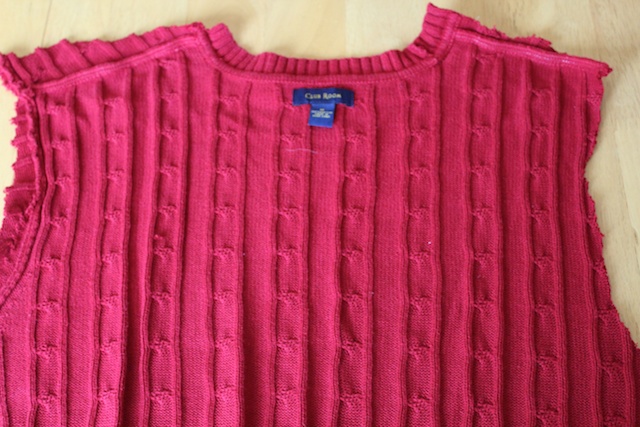
- Cable knit sweaters (I used two from Salvation Army)
- A pencil or marker
- Fabric scissors
- Hot glue
- Tube shaped item to cover in fabric or short candle sticks (optional)
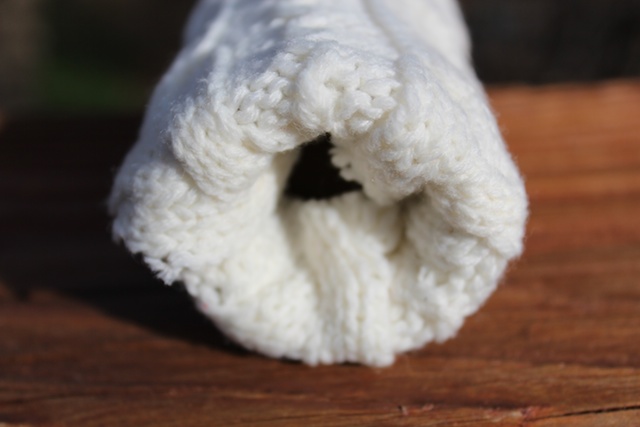
1. Start off by cutting the sleeves off of both sweaters. Then cut down the seams on the right and left side of each sweater so that the front and back of the sweater are separated.

2. Lay the sweater down so that the inside is facing up. This will be the inside of your topiary.
3. Place one of the styrofoam topiaries on the iside of the sweater. Using a pencil or marker (I used a sharpie because the material was so thick) roll the topiary, tracing the side and bottom edge. Cut the fabric along these lines with your fabric scissors.


4. Using hot glue, start to attach the sweater fabric to the topiary.

I used about three separate rows of hot glue and you want to ensure that you are keeping the fabric taut around the topiary. Wrap the fabric all the way around and secure with hot glue so the styrofoam can not be seen any more. If the seam is not perfect, dont'worry. You can either add some ribbon to cover the seam or just arrange your topiaries so it can not be seen.

5. Pull the fabric down around the base of the topiary. If the topiary is going to be sitting on a flat surface (table, mantle, etc) then you do not need to cover the entire base. However if the topiary will be on some sort of stand, cut a fabric circle from one of the sleeves to cover the rest of the styrofoam.

Here is the first topiary I made!

6. I made two other topiaries from white fabric using the same process. They looked great but I wanted varying heights so I added a tree base made from the inside of a roll of toilet paper. I simply cut it in half and layered one inside the other for stability. Then I cut a rectangular shape out of white sweater fabric and wrapped/glued it all the way around the tube. Push the remaining two ends into each side of the tube and glue.

7. Here are pictures of the finished product!


I am going to be linking up this week with:
Monograms and Manicures DIY Holiday Link Up
Wow Us Wednesday at Savvy Southern Style
Have a wonderful Tuesday! xoxo
Black Friday's Fancies
25 November 2025
6:10 AM
Black Friday elicits a variety of different emotions depending on who you are. Some could not imagine a more horrible experience than dealing with the crowds searching for a deal while others wait for this day all year to find that best buy (no pun intended :).
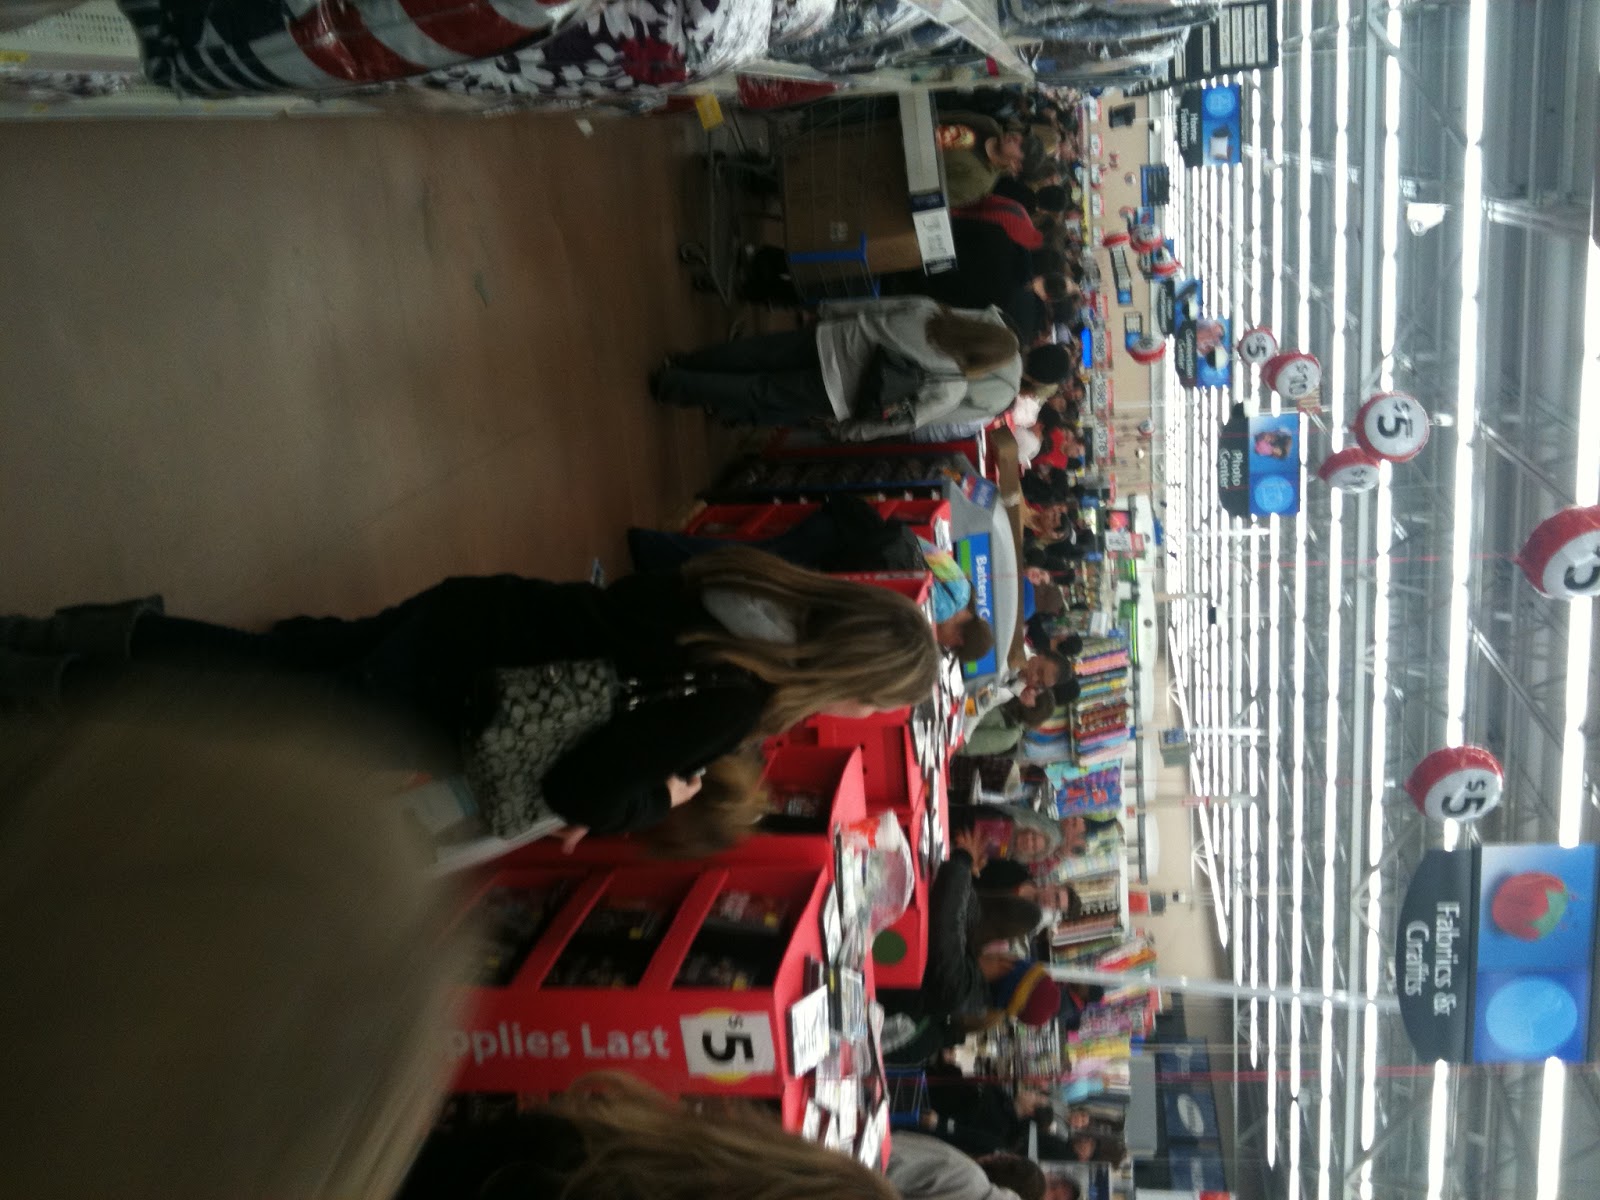
I fall somewhere in between these two extremes and am willing to deal with some crowds to find a great deal! Last night however was a new experience for me. I went to Wal-Mart with my mom at 10pm to buy $2 DVDs. This is her annual tradition and I joined her for the expedition. No other Black Friday experience would have prepared me for what was to come! We arrived at Wal-Mart at 10:15ish when the sale began to be met by barricades, EMTs, police cars and hoards of people. As we entered the store, and asked where the DVDs were, other patrons muttered "good luck"...not a good sign! We made it back to the DVD section and saw this craziness.
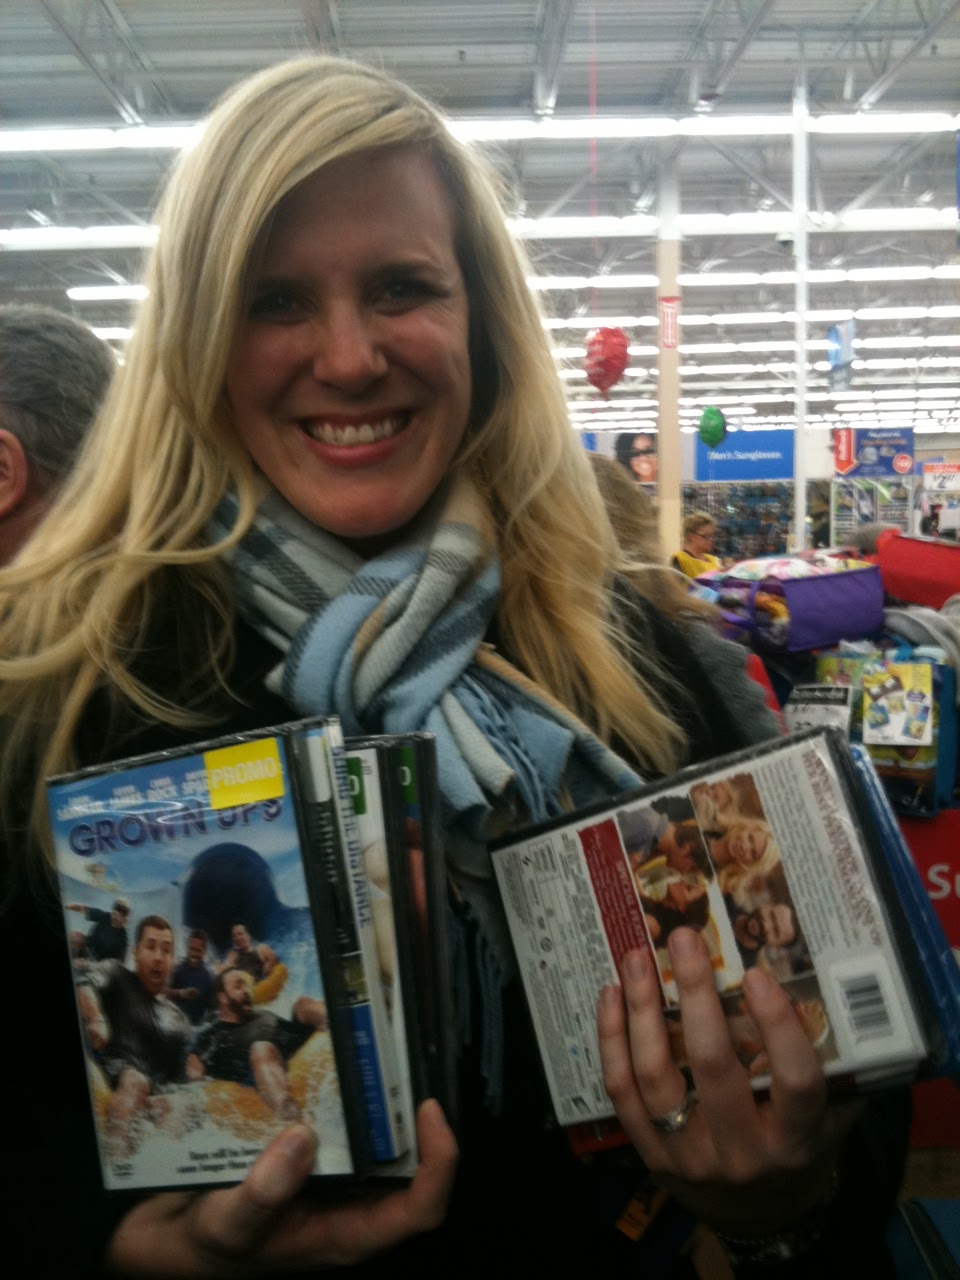
I started grabbing all the DVDs I could find that we don't already have and found a "safe aisle" (aka the bedding section) to call Kris to see what we already have. After several rounds of this I ended up with 2 blue rays and 8 regular DVDs.
We could only stand the madness for about 20 minutes before we fled for the lines. Someone had just dropped a glass item and the DVD mob started chanting "oooh" and "you break it you buy it". My mom is a Black Friday master and found a shorter line and we only had to wait about 15 minutes.
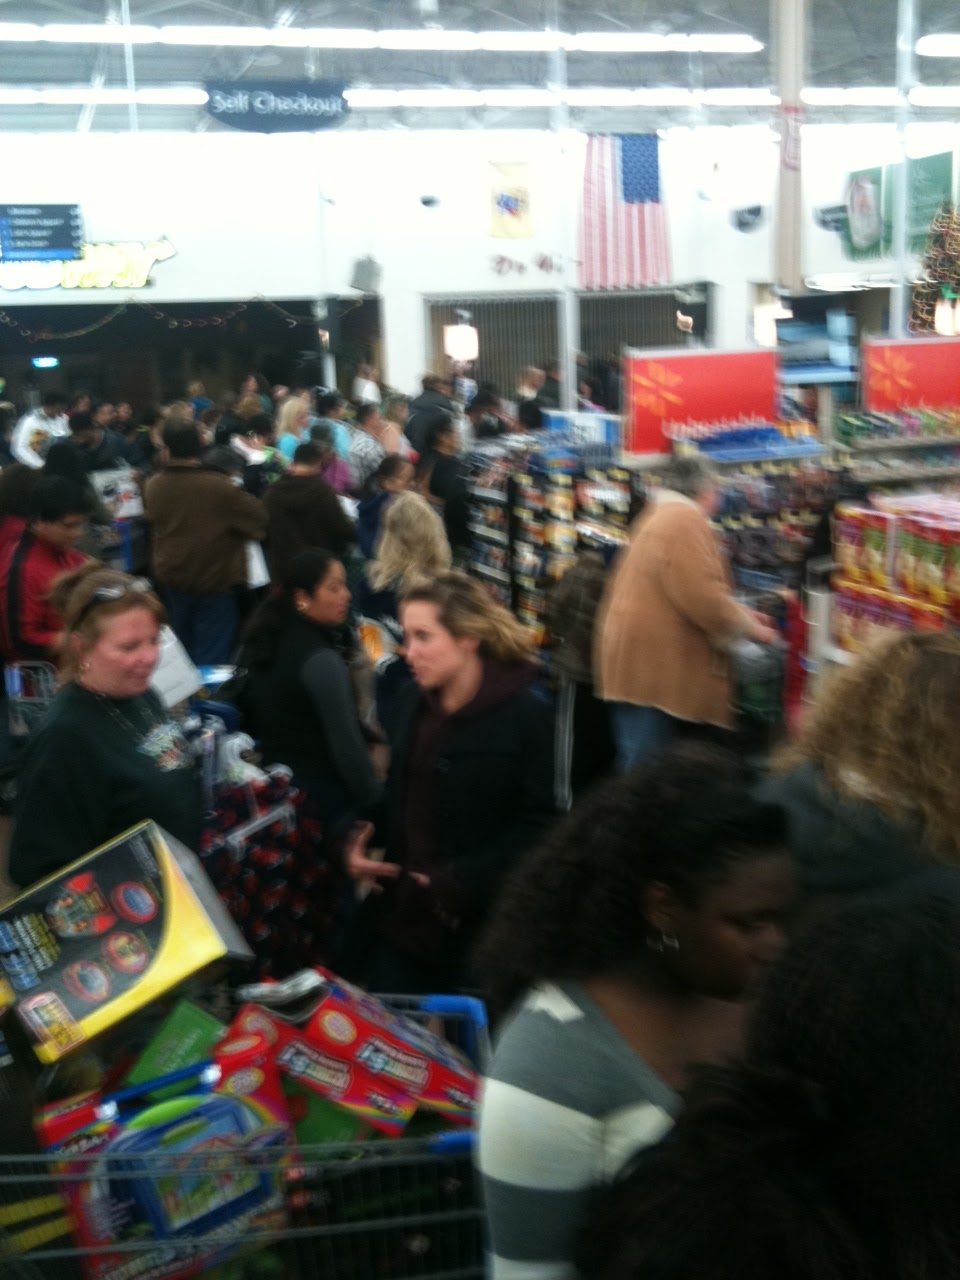
When we made it to the check out, our attendant had just finished haggling with the person in front of us over a $2 price difference and then promptly chugged a 5-Hour Energy drink and chased it with a bottle of water. My grand total was only $27 which was great, and although the experience was quite comical, I don't think I will be going to Wal-Mart again on Black Friday!
I must be a glutton for punishment, because today we are going to brave Black Friday at mall. I am hoping it is a bit more calm than the scene at Wal-Mart and I plan on hitting up some of my favorite stores like JCrew, Loft and Michaels. After last night's debacle, I want to wear the most comfortable outfit and not sacrifice in style! Below is my Friday's Fancies outfit for {av}'s link up at Long Distance Loving. My ideal black Friday outfit includes jeggings, flats, and a comfortable sweater. Also a cross body bag is a must because it would allow me to have both hands available to hold all of my purchases!
I hope my husband is not reading this (: Just kidding...kind of!
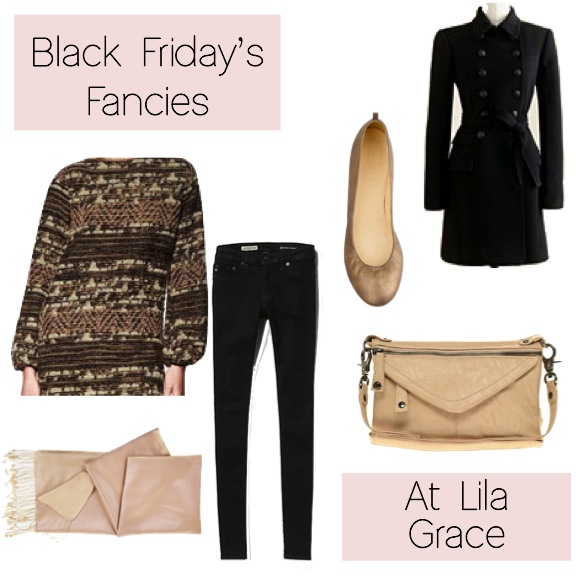
Shirt, Scarf, Jeggings, Flats, Coat, Bag
Whatever you do on Black Friday I hope you have a wonderful day!
Wish me luck at the mall!
xoxo
Meggan
Pinteresting Wednesday
23 November 2025
7:34 AM
Today we are leaving for the north east to visit my family for Thanksgiving. I am so excited to see everyone and celebrate the holiday! It has been almost six months since I have seen my family so this trip is long overdue. One of my favorite things about going home is that my mom, sister and I love to bake and craft together. I know it sounds like I stepped right out of the 1950s with that comment, but it's so fun to spend time together doing these things! I remember when I was little, I used to look forward to sick and snow days because it meant my mom would have a special "project" for us to do! Here are some of the projects I am thinking about tackling this weekend, of course courtesy of Pinterest.
I am linking up with The Vintage Apple for Pinteresting Wednesday here. I hope you have a great day getting ready for Thanksgiving! xoxo Meggan
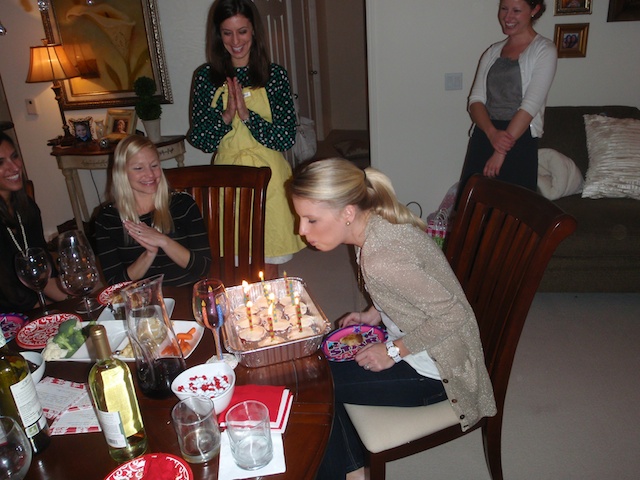
Empanada Baking Party (And Recipes!)
22 November 2025
3:59 AM
I am so blessed to have amazingly creative friends, and last night's birthday party for our friend Lauren was no exception. Vicky hosted an empanada baking party for Lauren that was complete with empanada making lessons, wine, birthday cupcakes and amazing friends! If you have never eaten an empanada before I highly recommend trying it! They are so delicious and are a staple here in South Florida.
via
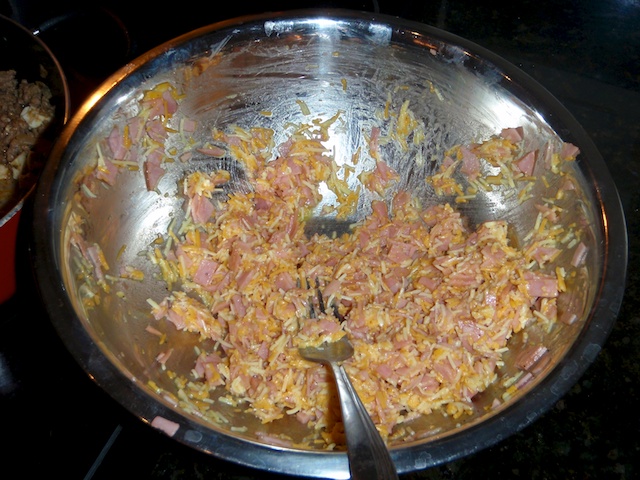
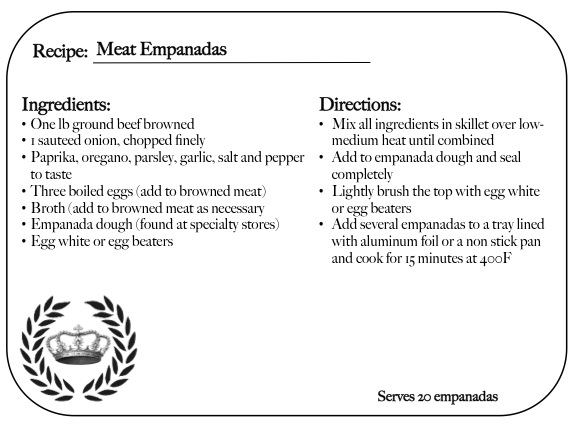
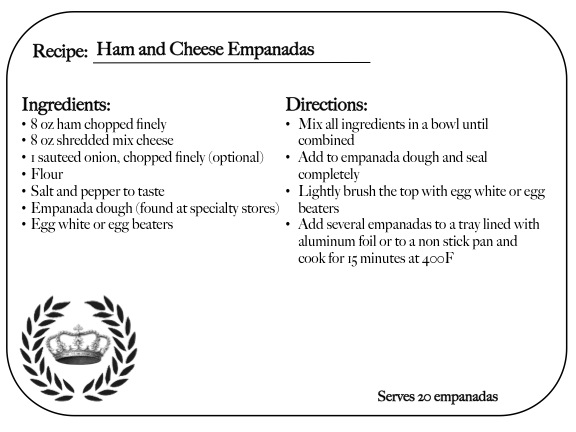
When we arrived Vicky had prepared the fillings (spinach, meat and ham/cheese) and had picked up the empanada dough from a specialty store. We added our fillings to the dough and sealed each empanada by pressing the edges of the dough together.
Spinach and Meat Fillings
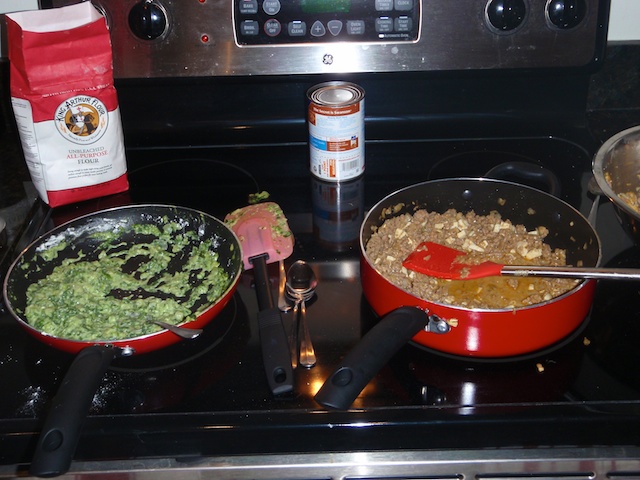
Ham and Cheese Filling
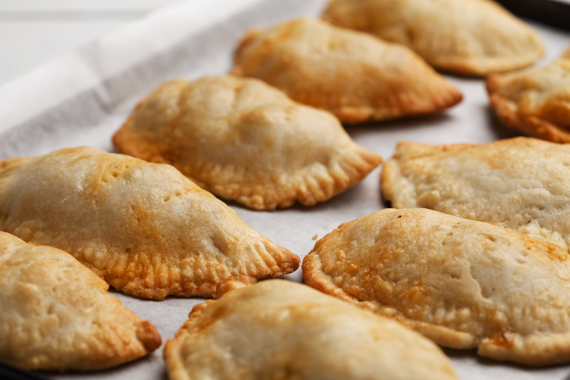
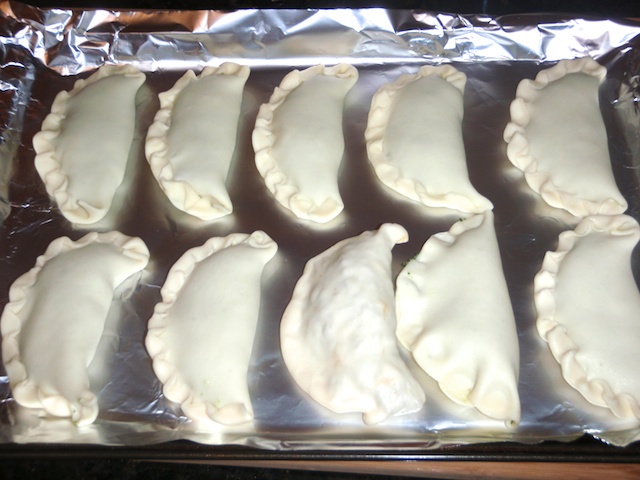
Empanadas ready to go into the oven!
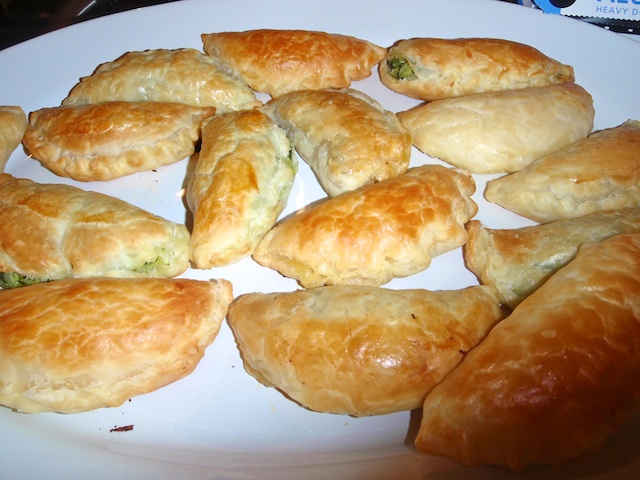
After 15 minutes, this is your finished product!
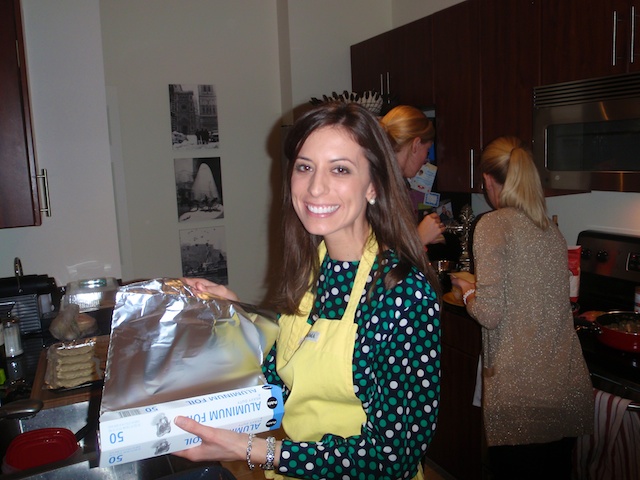
Vicky, our beautiful hostess getting one of the pans ready!
After eating way too many empanadas we sang Happy Birthday to Lauren!
Vicky gave us the cutest party favors - 3 pieces of empanada dough so we could make our own at home!

Vicky also gave us recipe cards for everyone to take home. Here are the three recipes that we used to make spinach, meat and ham/cheese empanadas. Enjoy!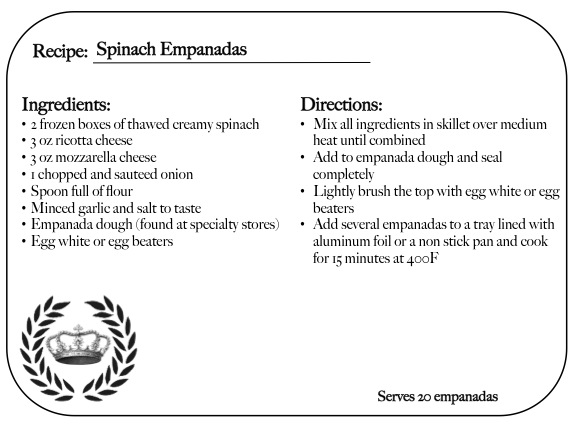
Weekend Wrap Up Via Instagram
21 November 2025
4:00 AM
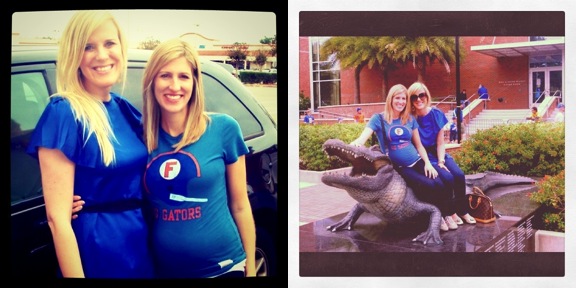
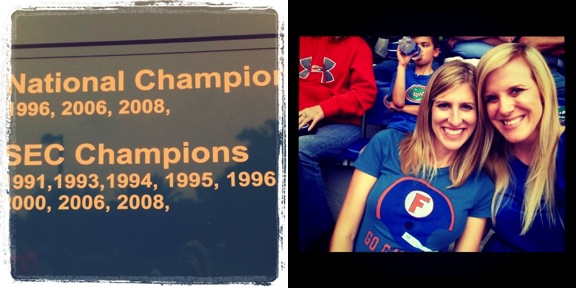
This weekend Kris and I went to Gainesville Florida to watch our alma mater, Furman, take on the University of Florida Gators. Although we both went to Furman, Kris was raised as a Gator and so when we got married I became one by marriage! We had an awesome time spending the weekend with two of my sorority sisters (who are also Gator fans) and their men! Furman played an AMAZING game and at one point was winning 22-7. I am linking up this week with Ashley from A Little Dash of Ash for her Instagram Party!

**Have to note here that my best friend Kristin (on the left) is pregnant and is in her third tri-mester! Doesn't she look amazing?! I may have gotten her a onesie from the bookstore that says "Future Gator" (:

I hope you have an amazing Monday! I can't believe we are SO close to Thanksgiving - only 2 days of work for me this week yay!
xoxo
Meggan
Mixing Prints
18 November 2025
3:55 AM
I must admit that I am a bit hesitant when it comes to mixing prints whether it is stripes, polka dots, paisley, animal print, etc. I don't do it often but I admire those who do! This week for Friday's Fancies with {av} at Long Distance Loving, we are showing off our favorite mix and match looks! I went with a look that is something I would actually wear. I also wanted to pick colors that were in the same family but prints that were different.
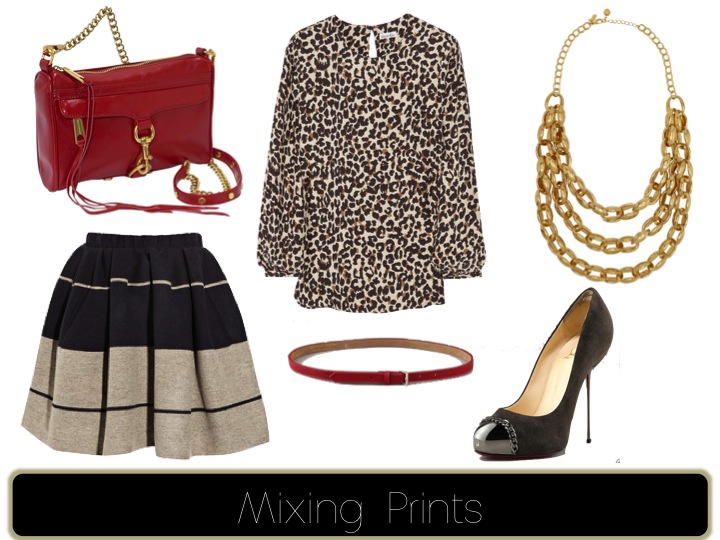
Bag, Skirt, Top, Belt, Shoes, Necklace
I loved putting this outfit together because it made me realize that maybe I can step outside the box more and take a risk when mixing prints! Be sure to go over to Long Distance Loving to check out the other awesome looks!
This weekend Kris and I are going to the Florida vs. Furman game in Gainesville! I am so excited about seeing our alma mater (Furman) play our favorite team (Florida)! I debated what colors to sport, but I went with a cute Francesca's cobalt blue dress with boots for my Gators and Kris is wearing a Florida shirt AND a Furman shirt! I hope you have a fabulous weekend!
xoxo
Meggan
My Christmas Wish List
17 November 2025
4:14 AM
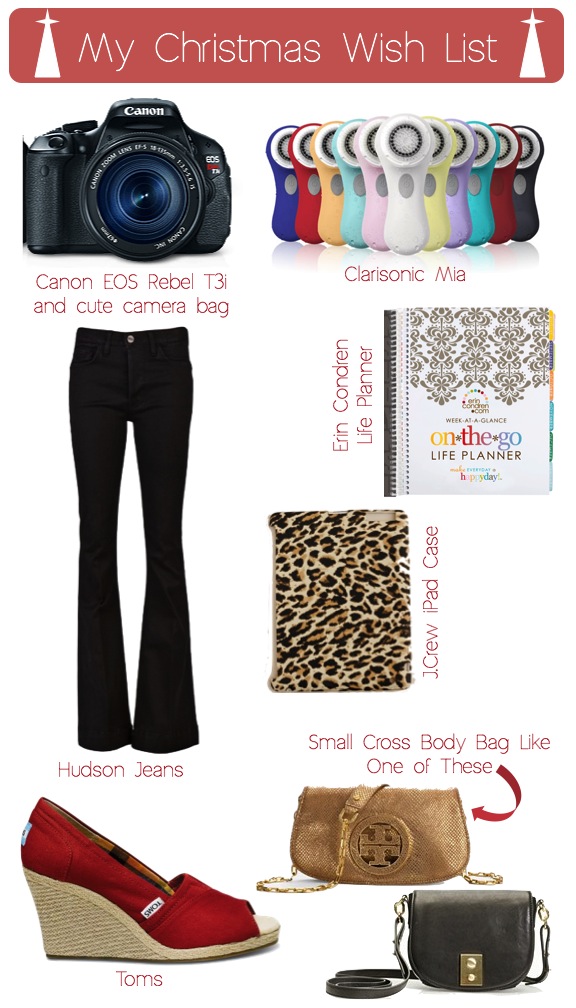
Christmas seems to come earlier and earlier each year, and one of my favorite things to do is shop for and give gifts! I love to see the excitement and happiness that comes with opening up a beautiful package and seeing just what you wanted inside! Well I recently put my Christmas wish list together for Kris and our families which is below, and I am so in the mood for Christmas now!
What is on your Christmas list?! Are you planning on going out for Black Friday? My dad is the Black Friday shopping guru and since we will be home for Thanksgiving I am planning on joining him! I love to get amazing deals in particular for the charities that Kris and I support around Christmas. We can get so much more for our money to give to children...like $2 movies at Wal-Mart! Hello! I will suffer through the crowds for that kind of deal!
Hope you have a wonderful Thursday loves! xoxo
Meggan
Hope you have a wonderful Thursday loves! xoxo
Meggan
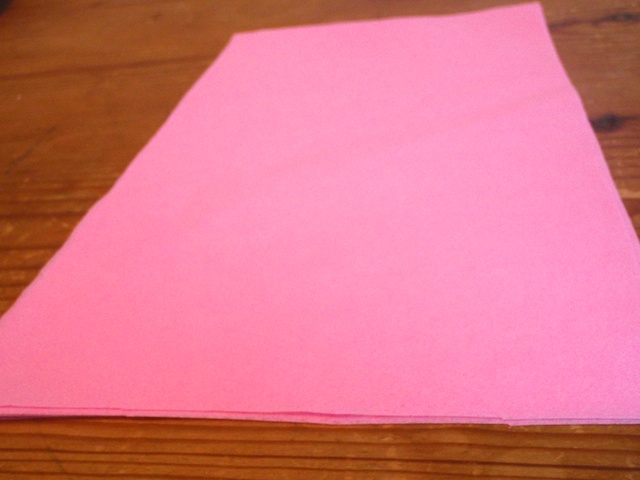
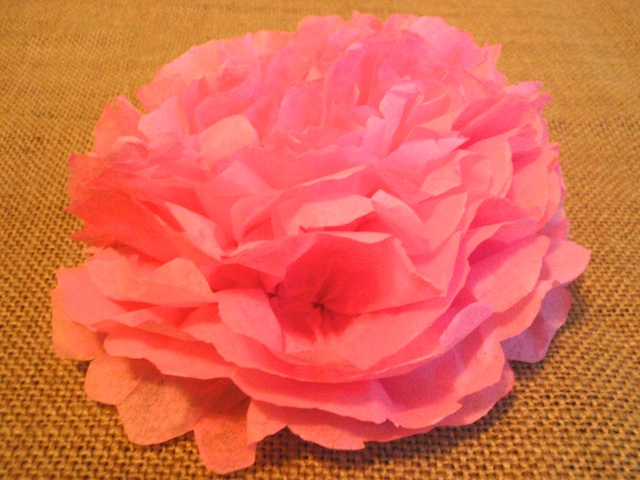
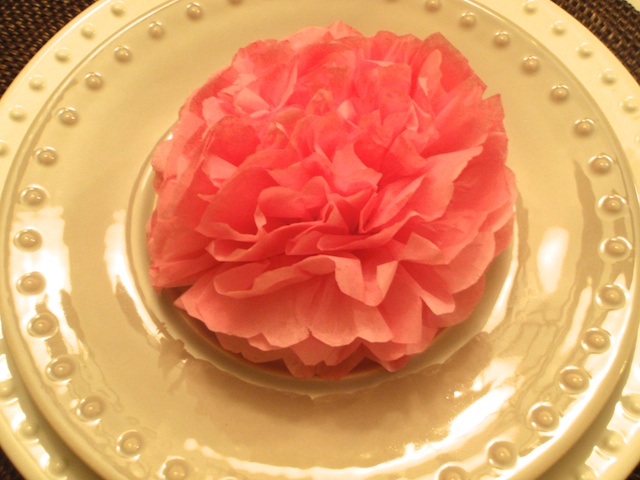
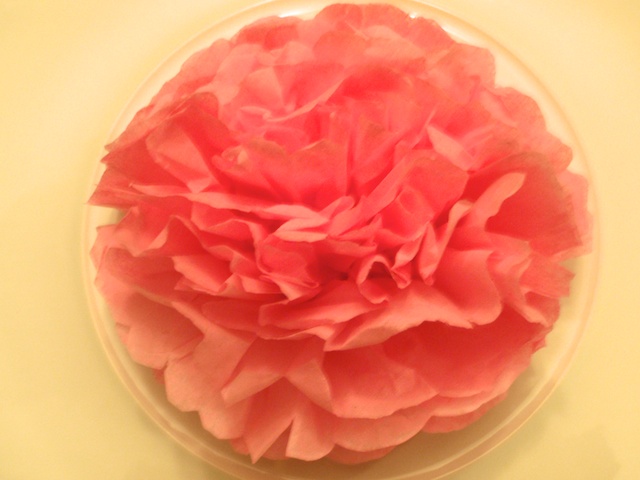
DIY Tissue Paper Peonies
14 November 2025
4:49 AM
Hi loves, I hope you had a great weekend! The reverse surprise birthday party we went to on Friday was amazing! We all met up for appetizers/champagne, and then a party bus took us to a lounge on South Beach. Our hosts had a table and we danced the night away! It was a total blast and we didn't get home until 4am! I think I am getting too old to do that LOL but we had so much fun! Saturday was super relaxing and the definite highlight of our day was going to Truluck's with Kris' parents for stone crabs because they are in season here. It was amazing food and company! Yesterday we celebrated our dog Harley's 8th birthday at the dog park. It was complete with lots of playing, dog treat bags for her dog cousins and doggie cupcakes; she loved it!
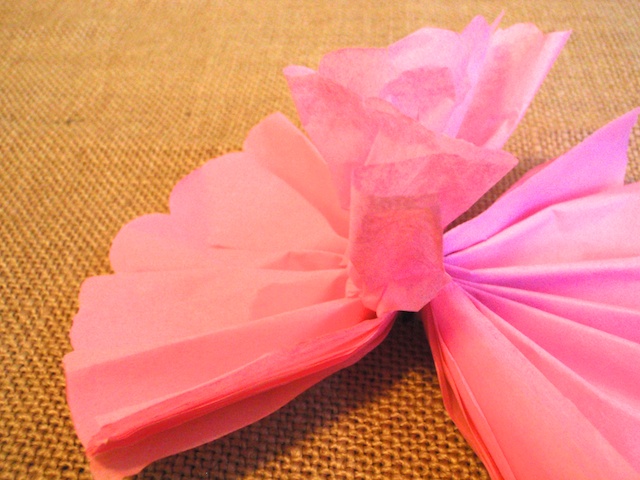
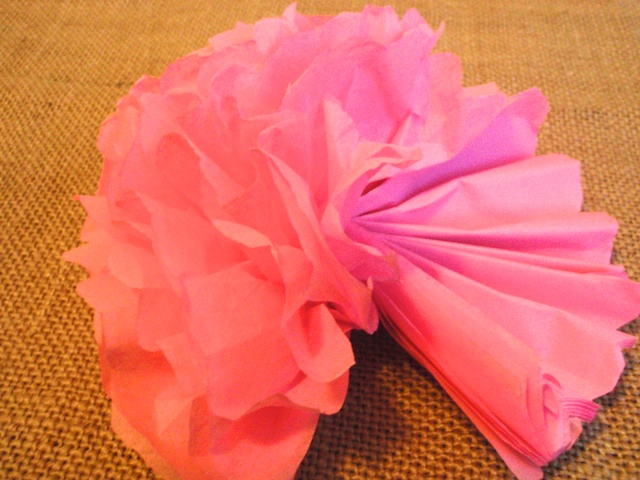
To kick off this Monday I wanted to share a tutorial with you today for a tissue paper peony that I am going to make for a bridal shower in January. This is a variation on the tissue paper poms that I made for the His Bride event (here). I love how simple and pretty these are, plus they are incredibly easy to make!
Materials
- Eight sheets of tissue paper cut to 7 inches by 12 inches- Floral wire
- Scissors
Instructions
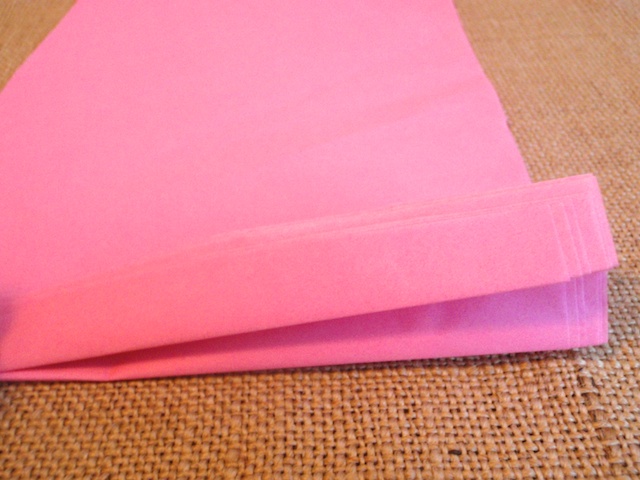
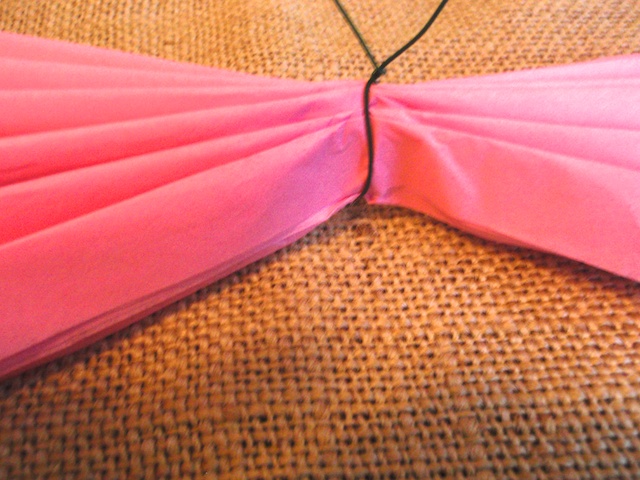
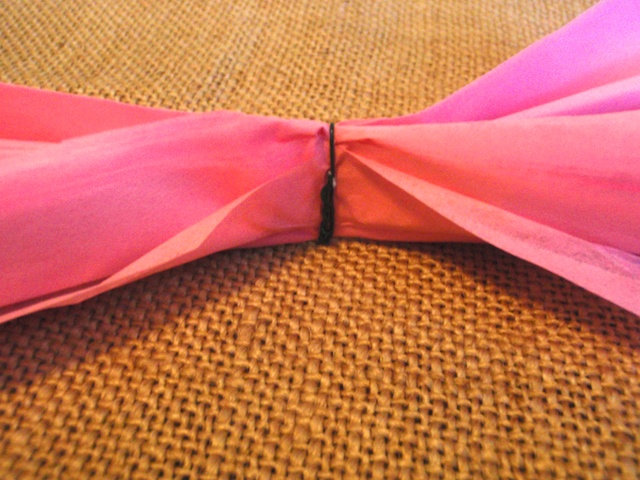
1. Cut the tissue paper to your desired length and width. I cut mine to 7x12 inches. Try to keep the length a few inches longer than the width, but you can adjust based on how large you want the pom to be.
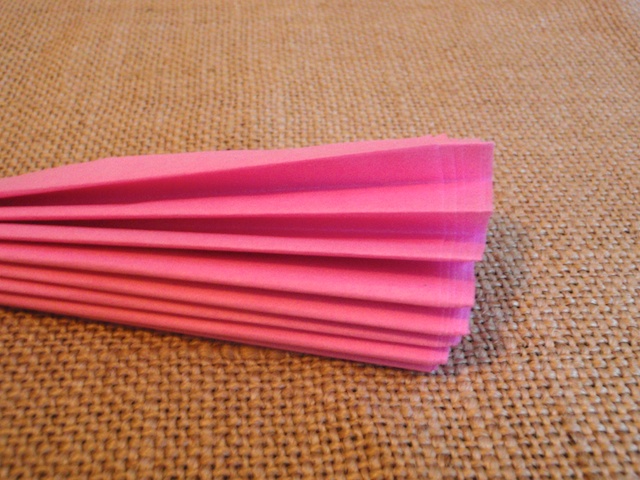
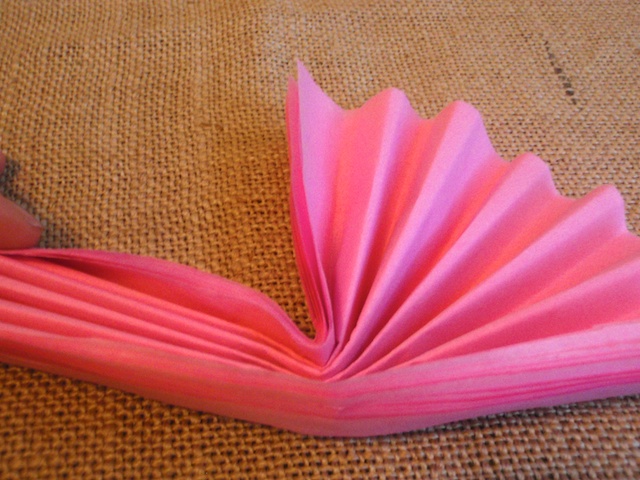
4. Tie floral wire around the middle and twist until secured tightly.
I hope you have a great start to your week today!
xoxo
Meggan